Queen Rearing for Commercial and Hobby Beekeepers 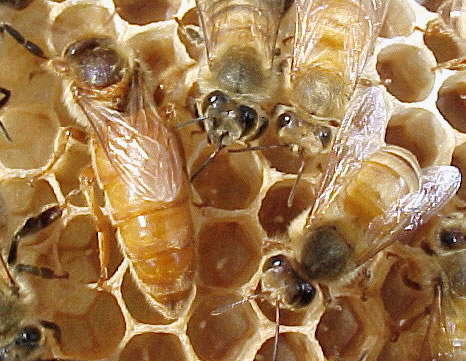
Raising your own queens is very rewarding in many ways.
- Save money while having the satisfaction of self sufficiency
- You control the quality and reduce the risk of introducing pests and diseases
- Disease resistant breeding stock is now available
- Well adapted local stock is utilized in matings, conserving bio diversity
- By working with nature, a fascinating natural process is unveiled
- Raising your own queens is the best investment of your beekeeping time
Requirements for successful queen rearing
- A good breeder queen to graft larva from.
- Grafting requires good light, good eyesight or appropriate magnification.
- Grafting larva of the proper age (1-24 hrs old).
- Queen rearing equipment (grafting tool, cell cups, cell bars and frame) can be made or purchased. Some queen kits eliminate grafting
- Natural mating requires 69 degree temps. and mature drones (15 days old)
- Several good books on queen rearing explain the principles of bee biology.
- Queen rearing classes.
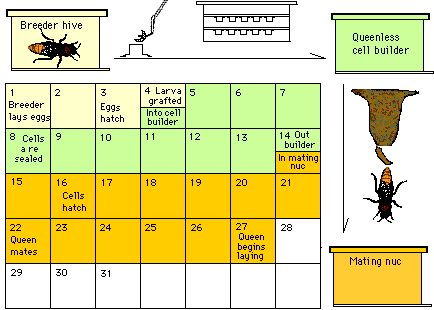
- Day 1 - Give breeder hive an empty dark brood comb to lay eggs in.
- Day 4 - Transfer (graft) larva into artificial queen cell cups, from the breeder comb. Place the frame into a strong colony (cell builder) made queenless the day before.
- Day 14 - Remove completed cells from cell builder. Leave one cell behind to replace the queen. Keep queen cells warm (80-94 F) until they are placed in queenless hives (mating nucs).
- Day 22 - Virgin queens are ready to mate. They require nice weather (69 F), and an abundance of drones to mate with. A few colonies within a mile are adequate for providing drones for mating.
- Day 27 - If queens mate without weather delay, they should now be laying eggs.
- Weather delays in mating will add days to the process, after 3 weeks delay, virgin queens may start to lay unfertilized eggs.
- Time your activities so that warm temperatures and drones are available when the queens are ready to mate.
Grafting is simply the process of transferring larva from the worker cell of the breeder's hive to an artificial queen cell. The shape of the cell, along with the queenless condition of the hive receiving the newly grafted cells stimulates the workers to feed them a diet which make them develop into queens.
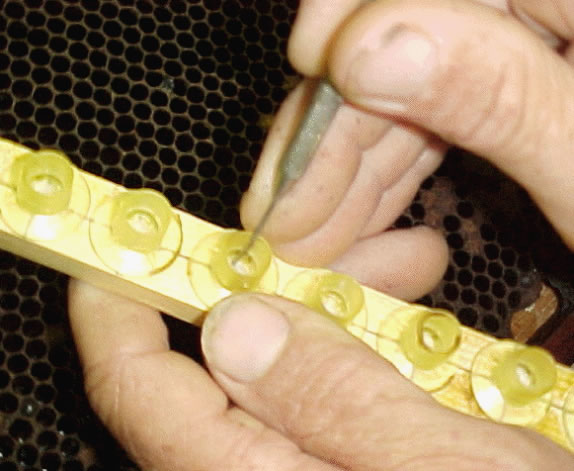
A grafting tool can be as simple as a bent piece of wire, or several varieties can be purchased. The tool is slipped under the larva which is lifted out and placed in the bottom of the queen cell cup. Priming the cells with a small drop of royal jelly or even diluted honey makes it easier to float the larva off the tool. Don't flip over the larva. An unsteady hand is helped by bracing it lightly on the comb.
Good light is essential, a headlamp works well, sunlight is ok if done quickly. Magnifying lamps are useful for those with poor eyesight.
Some people are expert grafters from the start, others need more practice. Grafting is what prevents most people from attempting queen rearing. This is unfortunate, because with an hour or two of practice, anyone can acquire this valuable skill. Give it a try.

- Graft from your best colony, or purchase a selectively bred breeder.
- Use the youngest (smallest) larva.
- By placing an empty brood comb in the brood nest 4 days before you graft, the larva will be the right age.
- Any strong hive can serve as a cell builder.

- Remove the queen one day before you graft cells.
- Place grafted cells in center of the brood nest.
- Place about 30 cells per colony.
- Large cells will be produced by well nourished colonies.
- Feeding is not necessary if a light honeyflow is on and pollen is abundant.
- Cells are placed in queenless colonies the day before they hatch.
- The mating process is usually only 75% successful.
- Small mating colonies minimize the losses due to unsuccessful queens.
- Mini-nucs are convenient for raising large numbers of queens.
- Cells can be placed in any queenless colony.
- Most queenless colonies will accept cells without queen cell protectors.
- Recent research shows that queen quality is best when they are left to lay eggs in the nuc for about a month.
- Queens are ready to mate 5-7 days after hatching.
- Temperature must be at least 69 F with no strong winds.
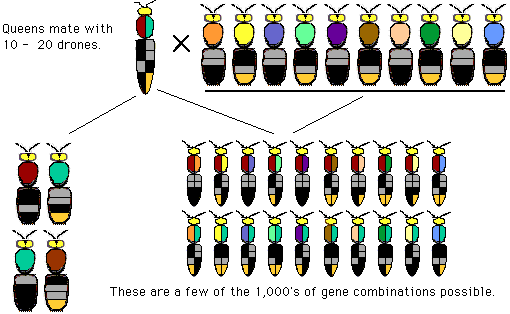
- Virgin queens mate with 10 to 20 drones on one or more flights.
- Drones and queens may fly a mile or more to drone congregation areas.
- Queens will begin laying eggs 2 to 4 days after mating.
- Mating can be delayed up to 3 weeks and still be successful.
No comments:
Post a Comment